 After graduating college, Amber became involved in running and mountain biking. In 2011, some friends suggested she participate in an Adventure Race, and she's been hooked ever since. Amber has participated in multiple 24-hr races and completed her first expedition race in 2014. |
Monday, March 24, 2014
Team TOG: Amber Clites
Tuesday, March 18, 2014
Technical AR Principles: Reading White Water
Reading white water – Learning how to read water is like learning a foreign language. Just as being relaxed and confident helps your cross-cultural communication skills, being relaxed will also enable you to pick the best routes through rapids while in your boat. A cool head allows you to clearly see obstacles, drops, and paths, whereas anxiety clouds your vision so that you see only an undecipherable mass of white froth.

Volume – Volume is the amount of water flowing past a point in the river per unit of time. In the United States, volume is almost always expressed in cubic feet per second (cfs), though occasionally it is given in some other dimension, such as cubic meters per second or cubic yards per minute. Depth gauges usually give the river level in feet, which is meaningful only if you know the individual river and therefore have a reference level or some other basis for understanding the relevance of the gauge reading.
A river’s power and speed always increase with an increase in volume. This usually means a difficult river will become harder with more water, but sometimes the opposite is the case. Sometimes high water causes a rapid to wash out and diminish in intensity. Experience on a particular river is really the key to knowing what to expect.
High water can create other problems. Flooding can cause trees to fall into the river or be picked up from the banks, increasing the danger to boaters. Extremely high water also tends to wash out most of a river’s eddies, those still-water havens behind rocks that are used for scouting and resting. On a difficult, flooded river, there’s little room for error. The water can be so powerful that your strongest attempts at maneuvering will be ineffective. If you want to learn all sorts of fun facts about rivers in flood, see William Nealy’s book, Kayak.
Gradient – River gradient refers to the average steepness of the riverbed. A rapid forms when a stretch of river has a higher gradient than the river’s average. A consistently steep river forms one very long rapid. Conversely, pools form where the incline levels out and the velocity of the water decreases. Most rivers are characterized as pool-drop rivers, with the riverbed alternating between relatively steep sections and level sections. These are the type of rivers most commonly run because they allow kayakers to rest after each rapid and provide them with an opportunity for checking out upcoming drops.
Gradient is measured in feet per mile. The most popular stretches for river running have gradients ranging from 10 to 100 feet per mile. The relation between gradient and difficulty depends, of course, on the individual river. Some rivers drop so evenly that they have miles of continuous low-grade riffles, despite high gradients. Conversely, a river with a low gradient may have miles of flat water with only one drop—a 200 foot waterfall.
As an extremely rough rule of thumb, most rivers that have gradients from 5 to 30 are usually Class 1 to 2 rivers, and gradients from 30 to 60 are likely to be Class 3 or 4. But as always, this depends on the particular river. Rivers with gradients up to 300 feet per mile are run, but only by experts, crazed maniacs, or those who can’t read topographical maps.

Water Velocity – Water velocity depends on where it’s being measured. In a straight section of river, the fastest current is in the middle where the river is deepest (See photo above). Water velocity decreases toward the banks and near the river bottom. Friction accounts for much of this loss of speed.
 When a river bends, a majority of the water travels on the outside of the bend. This causes a deeper and faster channel to form on the bend’s outer curve. Because the inside of the bend has slower-moving water, not much of a channel is cut into the river bottom and the water is shallow. Often, the riverbank is higher on the bend’s outside. If there are waves going around a bend, then the biggest and best waves are where the water is deepest—toward the out bank (See photo to the right). But be wary—the faster water at the outside of the turn can undercut the outer bank, causing trees to topple into the water. In addition, the outside bank may be covered with overhanging brush. The water wants to take you there, but this is not where you want to go, unless you enjoy being slapped and snagged by shrubbery.
When water hits an obstacle (midstream rock, bank outcropping, and so on), it piles up on the upstream side of the obstruction and then accelerates as it continues downstream. Consequently, water speed is somewhat faster downstream and to the side of (but not behind) and solid obstacle.
 |
| Water speed increases past obstacle and near eddy line |
Monday, March 17, 2014
Team TOG: Lizzie Bronson

Liz studied athletic training at Ithaca College, and currently works as a certified athletic trainer in Pittsburgh, PA. Although she was a sprinter on Ithaca’s track team, Liz transitioned to longer distances after becoming involved with the Pittsburgh marathon.
Liz was introduced to adventure racing in 2011, when she competed in the American Adventure Sports 24 hour Lionheart (and mountain biked for the first time). Liz is drawn to the sport because it constantly challenges her to push her physical and mental limits.
|
Friday, March 14, 2014
Technical AR Principles: Holding Your Paddle
Technical Adventure Racing Principles #1 -- Holding Your Paddle
For the next few weeks, I will be posting general principles, methods, and suggestions on Adventure Racing disciplines. While an infinite number of volumes could be written on any one of the disciplines found in this sport, we have highlighted a few of the major points in order to help you develop yourself and your team as Adventure Racers. I am starting with Boat Basics and will eventually move on to Navigation, Climbing, and last, but not least, Biking.
#1. Holding Your Paddle
Curved and offset blades are standard on all performance paddles. Blade curvature imparts more power to a stroke than a flat blade, but it does make proper paddle control a little confusing at first. The concave side of the paddle is called the power face, and the opposite, or convex side, the non-power face. A paddle is always held so that during a forward stroke, the power face is pointed toward the stern, or the rear of the boat.
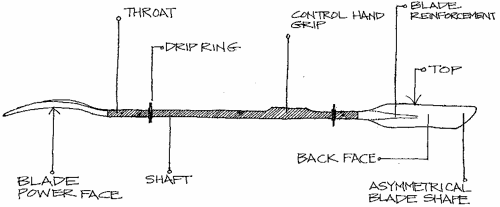
Because of the offset and curve, you need a strategy to make sure both blades enter the water with their power faces pointed back. Without such a system, one blade may slice through the water, offer no resistance, and possibly cause you to tip. Here’s the strategy: one hand, designated the control hand, maintains a firm grip on the paddle shaft and rotates the shaft within the other hand (the non-control hand) so that the correct blade angle occurs on both sides. Depending on the blade orientation, paddles are controlled with either the left or the right hand. Most paddles on the market are right-hand controlled. The control hand grips the paddle so that the wrist and forearm are at 90 degrees to the blade, with the power face pointed back. To place the opposite, non-control blade correctly, cock your control wrist out while maintaining the control grip. Keep in mind, for later reference, that there are times when you’ll want to cock your control wrist in. It’s not necessarily the case that left-handlers should automatically paddle left-handers should automatically paddle left-control. Some instructors go so far as to maintain that a paddler’s dominant hand should be the non-control hand.
Beginners sometimes mistakenly rotate the shaft partially within both hands. This causes blade disorientation because the permanent reference grasp the control hand is meant to provide, gets compromised. In addition, rotating the shaft within both hands makes it difficult to do some of the more precise strokes. If you’re having this trouble, try a visualization exercise and imagine that there’s super glue bonding your control hand to the shaft.

An oval shaft (instead of a round shaft), at least in the area of around the control hand, facilitates the correct positioning of the control hand and gives you more control over the blad angle with strokes such as the draw and the duffle (which will be explained in future posts). In addition, an oval shaft gives you a better grip and slightly more leverage with your control hand. If you already have a round shaft, you can make it oval in the control area by applying a thick line of Shoe Goo or some contoured fiberglass putty. You can even improvise an oval by placing a Popsicle stick on the non-power side of the shaft. A wrapping of electrical tape will secure the stick and provide a good grip.
#1. Holding Your Paddle
Curved and offset blades are standard on all performance paddles. Blade curvature imparts more power to a stroke than a flat blade, but it does make proper paddle control a little confusing at first. The concave side of the paddle is called the power face, and the opposite, or convex side, the non-power face. A paddle is always held so that during a forward stroke, the power face is pointed toward the stern, or the rear of the boat.
Because of the offset and curve, you need a strategy to make sure both blades enter the water with their power faces pointed back. Without such a system, one blade may slice through the water, offer no resistance, and possibly cause you to tip. Here’s the strategy: one hand, designated the control hand, maintains a firm grip on the paddle shaft and rotates the shaft within the other hand (the non-control hand) so that the correct blade angle occurs on both sides. Depending on the blade orientation, paddles are controlled with either the left or the right hand. Most paddles on the market are right-hand controlled. The control hand grips the paddle so that the wrist and forearm are at 90 degrees to the blade, with the power face pointed back. To place the opposite, non-control blade correctly, cock your control wrist out while maintaining the control grip. Keep in mind, for later reference, that there are times when you’ll want to cock your control wrist in. It’s not necessarily the case that left-handlers should automatically paddle left-handers should automatically paddle left-control. Some instructors go so far as to maintain that a paddler’s dominant hand should be the non-control hand.
Beginners sometimes mistakenly rotate the shaft partially within both hands. This causes blade disorientation because the permanent reference grasp the control hand is meant to provide, gets compromised. In addition, rotating the shaft within both hands makes it difficult to do some of the more precise strokes. If you’re having this trouble, try a visualization exercise and imagine that there’s super glue bonding your control hand to the shaft.
An oval shaft (instead of a round shaft), at least in the area of around the control hand, facilitates the correct positioning of the control hand and gives you more control over the blad angle with strokes such as the draw and the duffle (which will be explained in future posts). In addition, an oval shaft gives you a better grip and slightly more leverage with your control hand. If you already have a round shaft, you can make it oval in the control area by applying a thick line of Shoe Goo or some contoured fiberglass putty. You can even improvise an oval by placing a Popsicle stick on the non-power side of the shaft. A wrapping of electrical tape will secure the stick and provide a good grip.
Princeton Tec: Bike Light Review
 The EOS Bike is Princeton Tec's EOS headlamp that one can not only attach to your bike helmet but your bike frame. Thus if you are doing some bike touring or over night riding this is the light for you! For night mountain biking we often include both a higher lumen light on our bike itself and the EOS bike on our helmet that way you can physically see where you are looking along with where the bike is moving. Often I find myself keeping it rigged on the traditional headlamp strap in a front pannier while riding so it is ready for setting up camp. I keep the velcro helmet strap permanently rigged on my helmet and can mount the light quickly if need be. For one light that can work flawlessly for climbing, backpacking, etc. and also be secured to a helmet comfortably (instead of stretching a traditional headlamp's headband over your helmet) this is the ticket.
 Now, most folks don't get too excited about taillights. So long as it is red and perhaps even flashes nobody pays much attention. I on the other hand have a fear of being crushed to death. Why more people don't share my fear is beyond me. Very often I find myself in dense traffic in areas of Pennsylvania where cycling is not recognized as a legitimate past time. You're none too sure if folks are paying attention or even care to see you. Another hazard I find myself in is open stretches of road with high speed limits and no road lighting. Do you think that someone whipping along at 60 mph is going to see that single pukey LED? I don't want to bet on it. That's why I have used a Princeton Tec Swerve for a couple of years now. It is bright and annoying as shit. I mean that in a good way. Whenever I ride directly behind my friend who uses a Swerve too, I fear the onset of seizures. That's exactly what I want out of my taillight. Also, the light uses a heavy duty rubber band to mount the light on any bar. I have never had a problem with the light falling off. It makes for quick transfers from bike to bike. And if the need arises, the light also has a clip so you can mount it on your courier bag, jacket collar (hey, it has worked in a pinch), or bazooka sling.
Clockwise from left: PT EOS Bike, PT Push, PT Swerve and Cygolite ExpiliOn 250
The Push is a handlebar mounted light from Princeton Tec that they advertise for anything from urban riding to mountain biking. The Push throws off a good beam for riding around town and some night road riding. It isn't as expensive as many other lights are so if it gets swiped you won't need a government bailout. It is light enough and compact that you can throw it in your pocket while you stop for a brew and you won't get the inevitable question "It that a banana in your pocket or are you happy to see me?" The only thing that troubled me about the light is that there is little way to tell when the batteries are getting low. Sometimes there was a barely discernible flickering minutes before the light died, but usually it was rather abrupt. That can be a little alarming when you're ripping downhill at night...
I believe that the Princeton Tec lights are all splendid within their respective categories our team has been racing with their products for many years now and would recommend their many products for any outdoor activity....or night reading at your bed...or just a lamp to keep in your car. The best part is they are made in the U.S.A. You can't say that much any more so props to them!
They crew of guys are also one of the most entertaining companies we have come across in the past couple years do check out their videos to get a taste of the company!
Thursday, March 13, 2014
Team TOG: Toby Angove
 Meet Team AAS/TOG member Toby Angove. Toby is a long time adventure racer and a member of what we like to call the "twin towers" (himself and fellow teammate Bryan Mayer. Toby works at Indiana University of Pennsylvania in the Military Science Department and is a Scout Platoon Leader and 1st Lieutenant in the United States Army.
After a childhood of non-competitive manure-hauling and hay-bale-throwing, his racing career began while at college with marathons and triathlons. In the mid 90s, Adventure Racing presented itself as the next level of challenge – an opportunity to truly test one’s individual limits, character and the strength of team dynamics. Since then, Toby has competed regionally, nationally, and abroad in Sprint, Stage, and Expedition Races as well as work in race production and course design.
Monday, March 10, 2014
Kuat Racks: NV Review
Over the years we’ve looked at several hitch mounted bike racks. We’ve checked out popular offerings from the competitors. In this review we’re taking a look at a relative new comer to the bike rack market, Küat Innovations (pronounced Koo-at). Küat has included some innovative features into their racks that we think many riders will find helpful, especially adventure racers. Küat offers a variety of bike racks in their lineup. In this review we’ll be taking a look at their tray style NV 2” 2-bike rack (there is also a 1.25” hitch version). Available only for the 2″ version, Küat also offers a 2 bike extension for those looking to carry more bikes with the NV rack.
The Product:
The Küat NV rack connects to the hitch mount on your vehicle. If you do not have a hitch on your vehicle already, you would have to get one installed first to be able to run this style of rack. We are reviewing the 2” version of the NV but they do make a 1.25″ version. The rack features are the same between the 2″ and 1.25″ version, except the 1.25″ version can not be equipped with the extra 2 bike attachment.

History:
Küat launched their first bike rack in 2008. Since then they’ve added more racks to their lineup. Their vision is to create the best racks on the market with strength, style, and the rider in mind. With the NV they wanted to create a platform rack that was easy to use and secure. They also wanted to create a rack that allowed for multi-functional use by including a repair stand into the design. No longer would riders have to pack a repair stand along on each trip and find stable ground. The vehicle is the anchor point which allows for use in just about any terrain scenario.
Features:
- Carries up to 2 bikes (can hold up to 4 with extension). 1.25” version can only hold 2 bikes.

2 bike extension (
- Carrying capacity for the 2” model is two 60lb bikes for 120lbs total. With the extension the 2” model can carry four 40lb bikes for 160lbs total.

- The NV can fit a wide range of bikes (20” to 29” wheel sizes) handling skinny road bikes to large downhill bikes.
- The NV makes minimal bike contact with the bike’s wheels and not the frame.

- Küat integrated a quick release lever in the racks tilting mechanism that allows the rack to be stored upright, down flat for use, and tilted down for rear vehicle access without having to remove any bolts from the rack.


(click to enlarge)


- Küat includes an integrated adjustable repair stand called the Trail Doc.

- The rack comes with built in security cables and locking mechanism.

- The hitch pin comes with a lock and removable sleeve for pin hole size variances.

- Hand tightened cam system locks the rack into the receiver with a wedge (chrome wedge in the above picture) for secure fit.

rubber knob for hand tightening rack into receiver
- Küat offers a lifetime rack warranty.
Weight:
- 50lbs
Dimensions:

NV rack dimensions
real world bumper clearance on our test vehicle was very good
Installation and Bike Mounting:
When you receive the NV rack it is in several pieces. Küat includes all the hardware and tools needed to put the rack together. Assembly is very straightforward and is documented clearly in their instruction manual. Some of the key steps are outlined below.

included hex keys
First you need to lay out the rack on the ground in its assembly orientation.

Then you slide the 10mm bolts through the arm and through the rack center to the other side and attach with a lock nut. Once fully tightened the lock nut is recessed and secured.

recessed lock nut detail

arm attachment after final assembly
Once all the bolts are tightened on both arms you need to insert the Trail Doc repair stand. Now you’re finished with assembly and just need to mount it to your vehicle.

The steps you have to perform to install the rack and mount your bikes are as follows:
- Install the rack into the hitch and secure with hitch bolt and lock.
- Hand tighten the hitch knob until rack is firmly secured.
- Use lever to fold the rack down
- Rotate the arm down and release the rear wheel strap
- Load your bike into the trays
- Secure your bike with the arms and wheel straps
Bike Securing:
The NV rack has built in security cables and a hitch pin lock. Küat includes 3 pair of keys (the locking hitch pin and cable lock use different keys) giving you 2 spare sets with a nice bottle opener key chain. The security cables come out of each rear wheel cap and are magnetically secured in place when not in use.


locking hitch pin

stored security cable end with lock

stored security cable
Küat’s method to secure bikes to the rack is simply thread the cables that come out of each rear wheel area through the rear triangle of each bike and attach in the middle with the lock.

security cable installed
Adjustability:
The NV rack is highly adjustable allowing for use with 20” wheels all the way up to 29” wheels. To hold 20” and 24” bikes you’ll need to install a wheel adapter that comes with the rack.

wheel adapter for 20" and 24" wheels
The front wheel tray and arm are contoured to hold road width tires securely as well as mountain bike tires. We tested tires widths up to a Schwalbe Muddy Mary 2.5 (which has a very wide width that is comparable to a 2.7″ Maxxis tire) and they all fit fine.

Schwalbe Muddy Mary 2.5 tire
The front wheel arm rotates into place and ratchets down to the secure it in place. The ratchet detents on the NV are much smaller than other racks we’ve tested. This allows you secure the front wheel locking arm without having to push as hard to get the final click.

The rear wheel security strap can slide along the full length of the tray. This allows for easy securing of long and short bikes alike. We tested up to a bike with a 47” wheelbase and there was plenty of room to spare. The wheel strap snugs up by hand tension alone. Some competing racks have integrated a ratcheting system to enable the system to tighten the wheel tighter but this simple design has worked well enough in the field for us.


the clearance between the arm and rear chainstay is very wide (click to enlarge)

plenty of room between bikes
If you do want to remove a tray to lighten your load and carry only one bike, removal is easy. Just simply loosen the 2 10mm bolts and the 2 arms detach.
Construction Quality:
The construction quality of the NV rack is good. The rack pieces all came in a nicely painted grey finish with orange anodizing on the aluminum parts. The arms utilize large tubing with solid looking welds. The 10mm bolts and lock nuts used to assemble the arms are nice quality and the tolerances of all the parts fit together without issue.

front wheel tray and rear wheel strap underside detail
The front wheel trays are made out of heavy duty plastic and the rear straps have aluminum spines for added strength. The hitch tongue itself was solid and the wedge helped secure the rack very tightly in our receiver. The only minor play that is noticeable was in the tilt mechanism, but is easily avoided by double checking it is locked before you get going.
Form and Function:
The NV is easily one of the best looking racks we’ve ever seen. The orange anodizing pops with the grey rack and adds a bit of style, the new all black rack is hot! The NV is not one of the smallest racks we’ve tested. It’s full length trays add a bit of width to the rack.
*note the arms are not in stowed position, when stowing the arm are folded over the central beam so they can't move backwards
The rack is easy to load and unload. The arms rotate into place easily and the smaller ratchet detents make getting the arm tight much easier. The arms are rubber coated so they don't rub the finish on forks harshly.
The tilt mechanism on the NV is nicer than a lot of racks we’ve seen because it is lever operated with a spring assist. To lower you simply pull the lever down and the rack pivots into place and the pivot bolt snaps into the hole for the position. The lever stays attached to the rack and never has to be pulled out or re-inserted to rotate the rack through its positions. To lower the platform past horizontal for rear vehicle access you just pull the lever and the rack tilts almost to the ground away from the vehicle. Simply lift the platform again and it clicks into place without having to touch the handle. The spring loaded lever is really handy for lifting and lowering the rack one handed.

tilt lever detail

when tilted for rear access the L shaped stop comes into contact with a bumper to limit the rack from tilting further

you can see the 2 static locations for the pin to click into
The repair stand is easy to use and operate. Simply release the QR and pull up the stand clamp until it clicks into place. You can easily rotate the head by pulling the lever and twisting the head. The clamp only has 8 angled positions for different orientations so its not quite as infinitely adjustable as we’d have liked.


The rack clamp has a metal hand crank to open and close the jaws. The clamp can open enough to fit between a .75″ to 2.75″ tube. It has rubber jaws to help the jaws grip the tube properly and securely without damage. When not in use just turn the clamp parallel to the rack and slide it back into the rack. Once fully inserted the clamp head is held in the lock position by the same spring loaded clip and the QR so it can’t fall or detach while driving.


We found the repair clamp to work great for quick repairs and adjustments. We wouldn’t want to do any heavy wrenching on the stand as it isn’t built for this use but for light duty wrenching it works great.

Price, worth every penny:
- $499 2” 2 bike rack
- $349 2 bike extension
Conclusion:
Overall the Küat NV rack is a great rack. It features some really thoughtful design elements that should benefit riders greatly. With its built in repair stand, highly adjustable design, and security features the NV is definitely a rack that should be put on anyone’s list who is looking for a nice hitch mounted bike rack. Part's don't break easily and plastic parts aren't there to be breaking. Purchase one at American Adventure Sports if interested and mention this article to receive a discount!
Subscribe to:
Posts (Atom)